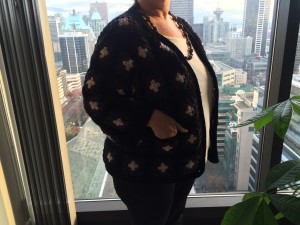
Here is the finished jacket with a border of five rows single crochet on both sleeves and the front and bottom edge.
There is a square folded into a triangle for the arm gusset which gives it a bit more room.
Buttons or Toggles
This week I was at my local yarn store (LYS) and looked for suitable buttons for the jacket.
i want to have something a bit chunky and I was really looking for a natural wood or toggle type button.
I still haven’t decided just how many buttons I’ll need maybe three or five. I always choose an odd number it is somehow more visually satisfying to have a non even number.
Final thoughts
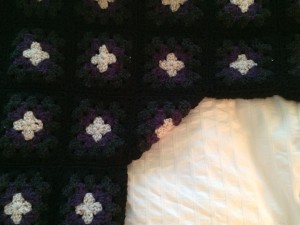
This jacket has worked out well. It is slightly heavier than I had imagined and it will be really good on colder days, which is fine as winter draws on.
I like the granny square look and will probably do another one without sleeves in the taupe colour and lighter accent colours for the spring.
The pocket is a good feature and I’m even thinking of making an inside pocket higher up for my phone, you know.
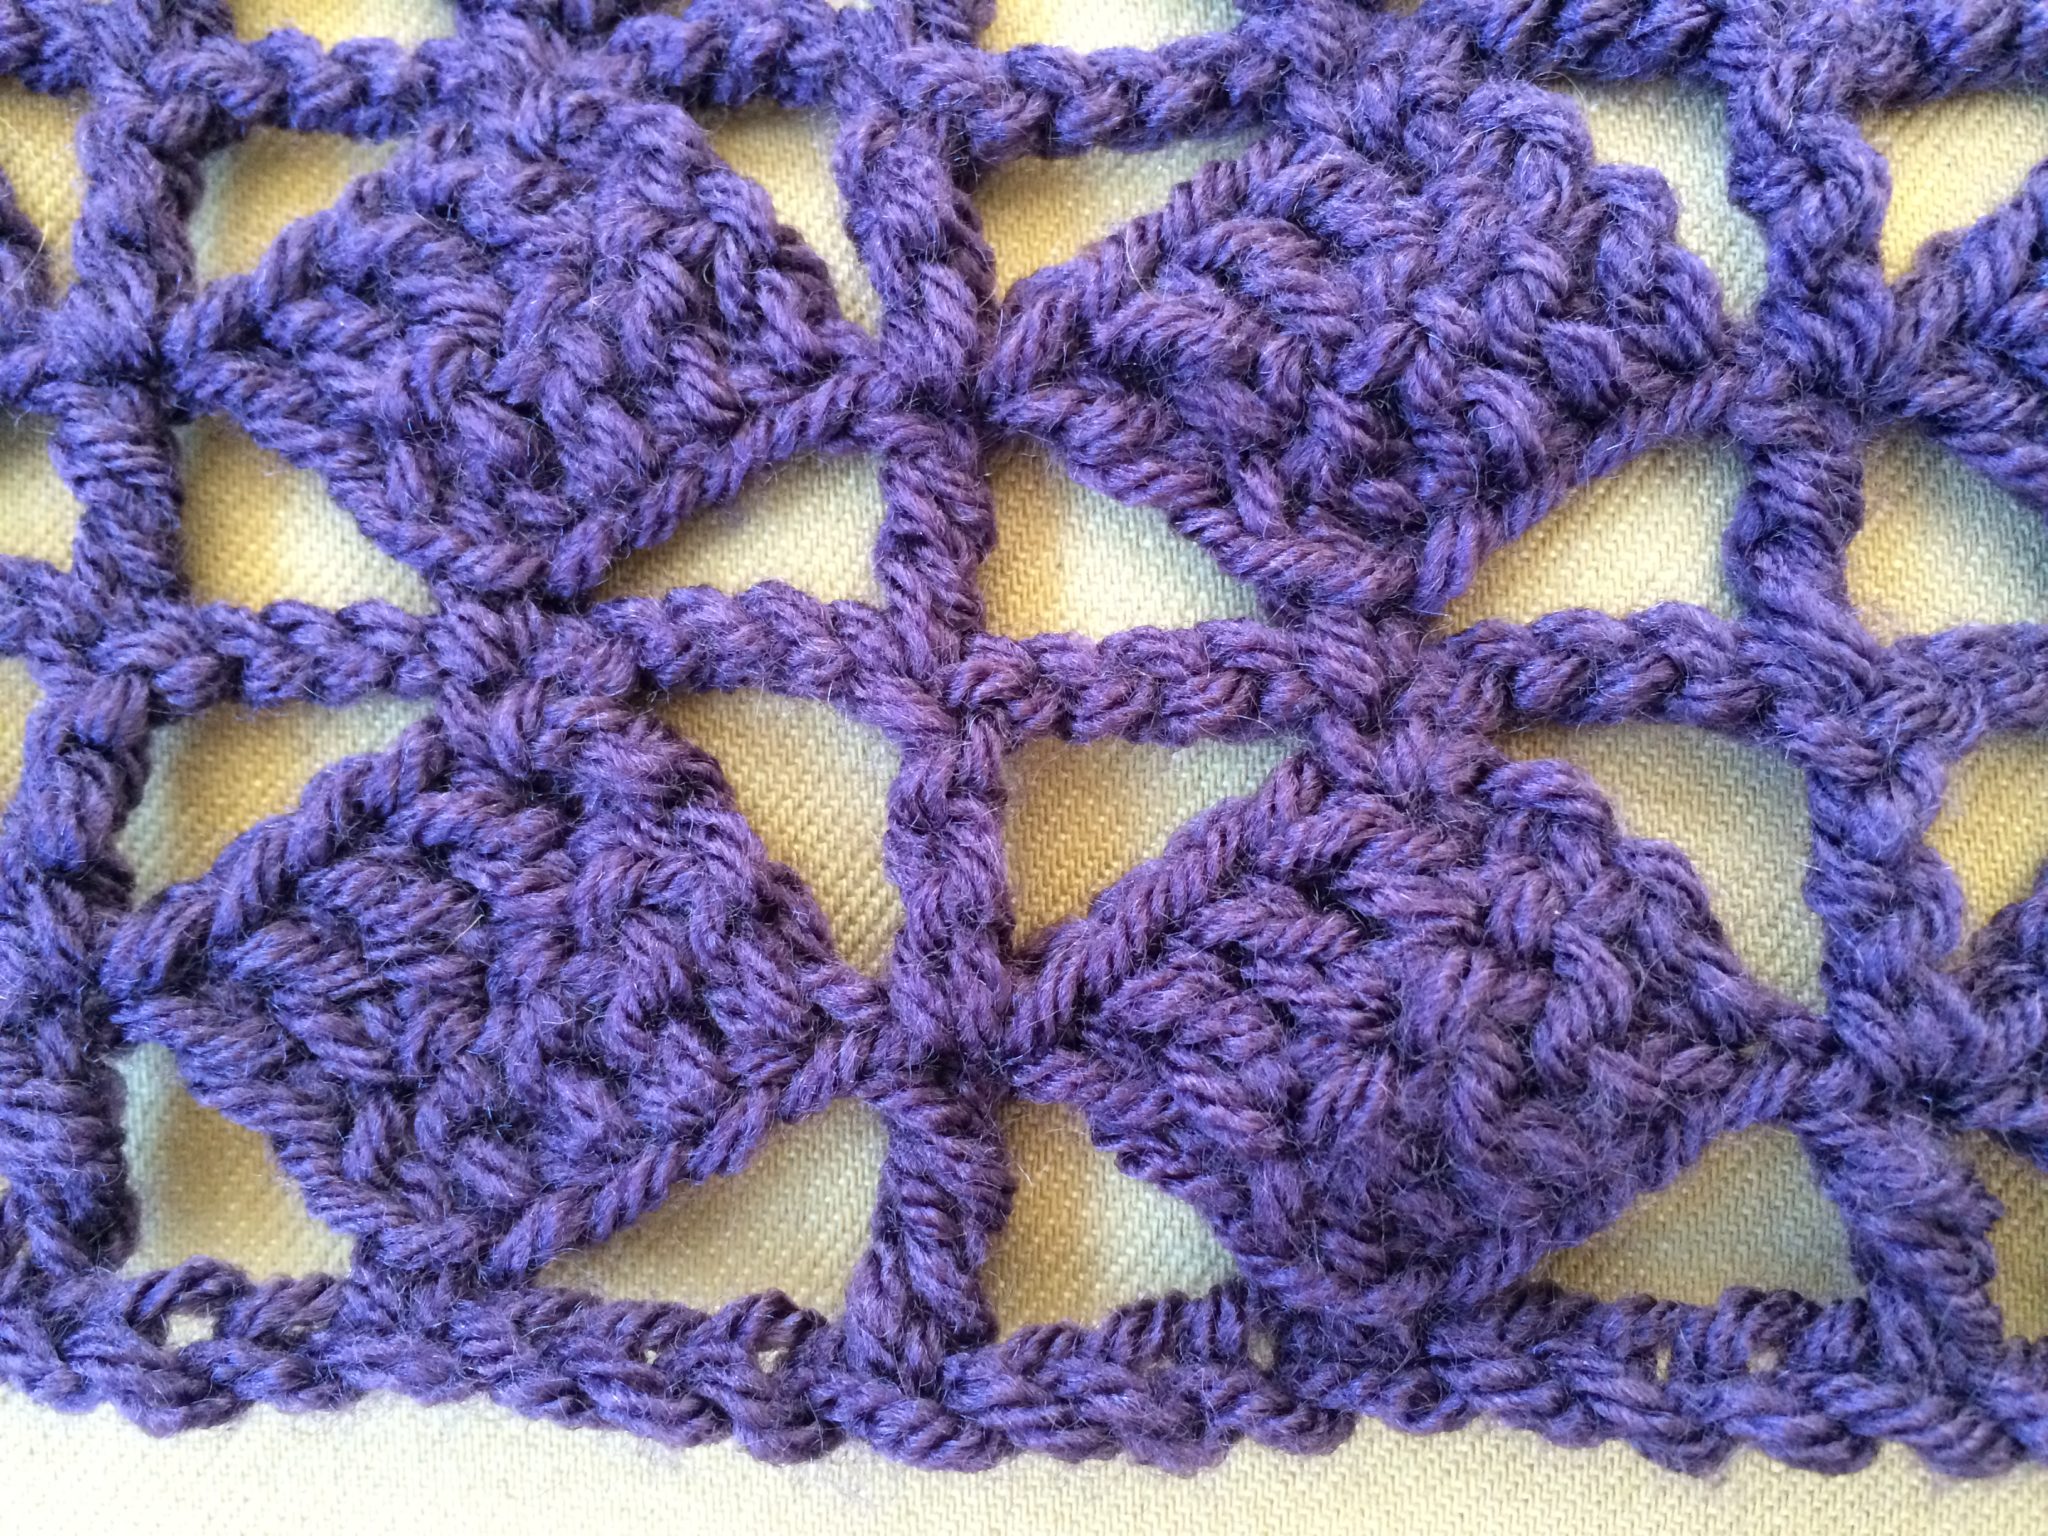
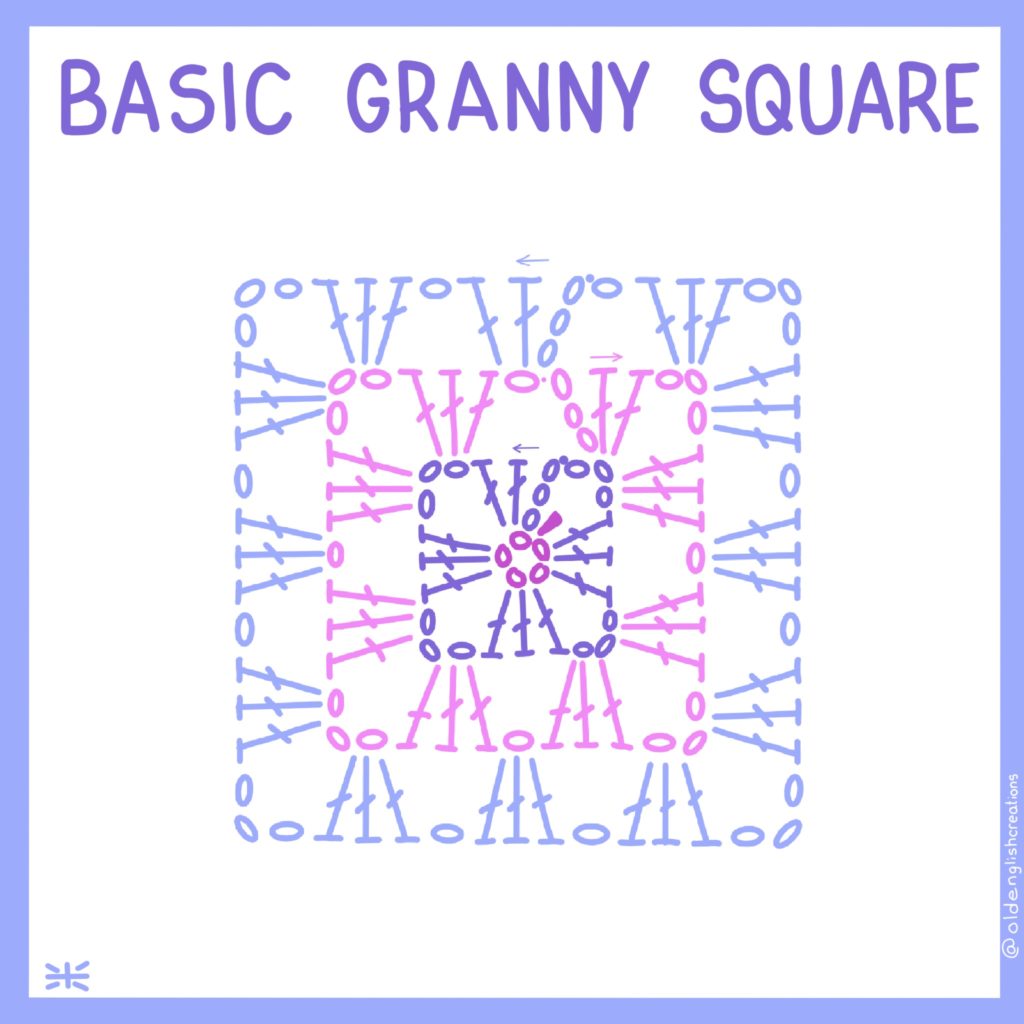
A Granny square is the building block of crochet work. Every crocheter can learn to make a Granny square and it is lots of fun.
Each row is made with a different color yarn and there are four rows in total. You can add as many rows as you like.
Pattern tips for Granny squares
Turn your work
I make my Granny squares but I turn the work from the front to the back each row change.
This means that row 2 (and all even rows) are done with the wrong side facing (WSF) me as I start the row, and row 3 (and all odd rows) are done with the right side facing (RSF) me as I start the row.
I do this because if you continue on the right side all the time the square can easily become slightly out of shape as you are always going one way.
But, if you turn the work each row it creates a balance for the square as the stitches are worked first one way and then the other way.
It is like knitting on two needles where you knit one way and then the other way, but when you do circular knitting (all the same way) the work starts to creep in one direction.
Over time I have found that Granny squares made right-side-facing then wrong-side-facing keep their shape even after being washed for years.
How to Make Corners
Every corner is a 3 chain (3ch or ch3) corner. If you have 3 chains in the corner you have one on each side when you are sewing up. This helps to keep the squares well, square as you sew.
Sometimes I add add a 1 ch between the groups of 3dc on the sides.
Joining Granny Squares
I recommend sewing your squares together. I am not keen on crocheting them together as that can make a bulky seam and it is not always regular in tension.
When you sew your squares together the seam lies flat which is nice. In this particular Granny square pattern I will use the same black yarn that I used for row 4.
If every Granny has the same color on the last row it is easier to sew them together so it looks neat.
Crochet Terminology
Please note: This pattern used US/Canadian crochet stitch notation not UK or RSA. You can learn more about the difference between USA and UK crochet terminology and follow along.
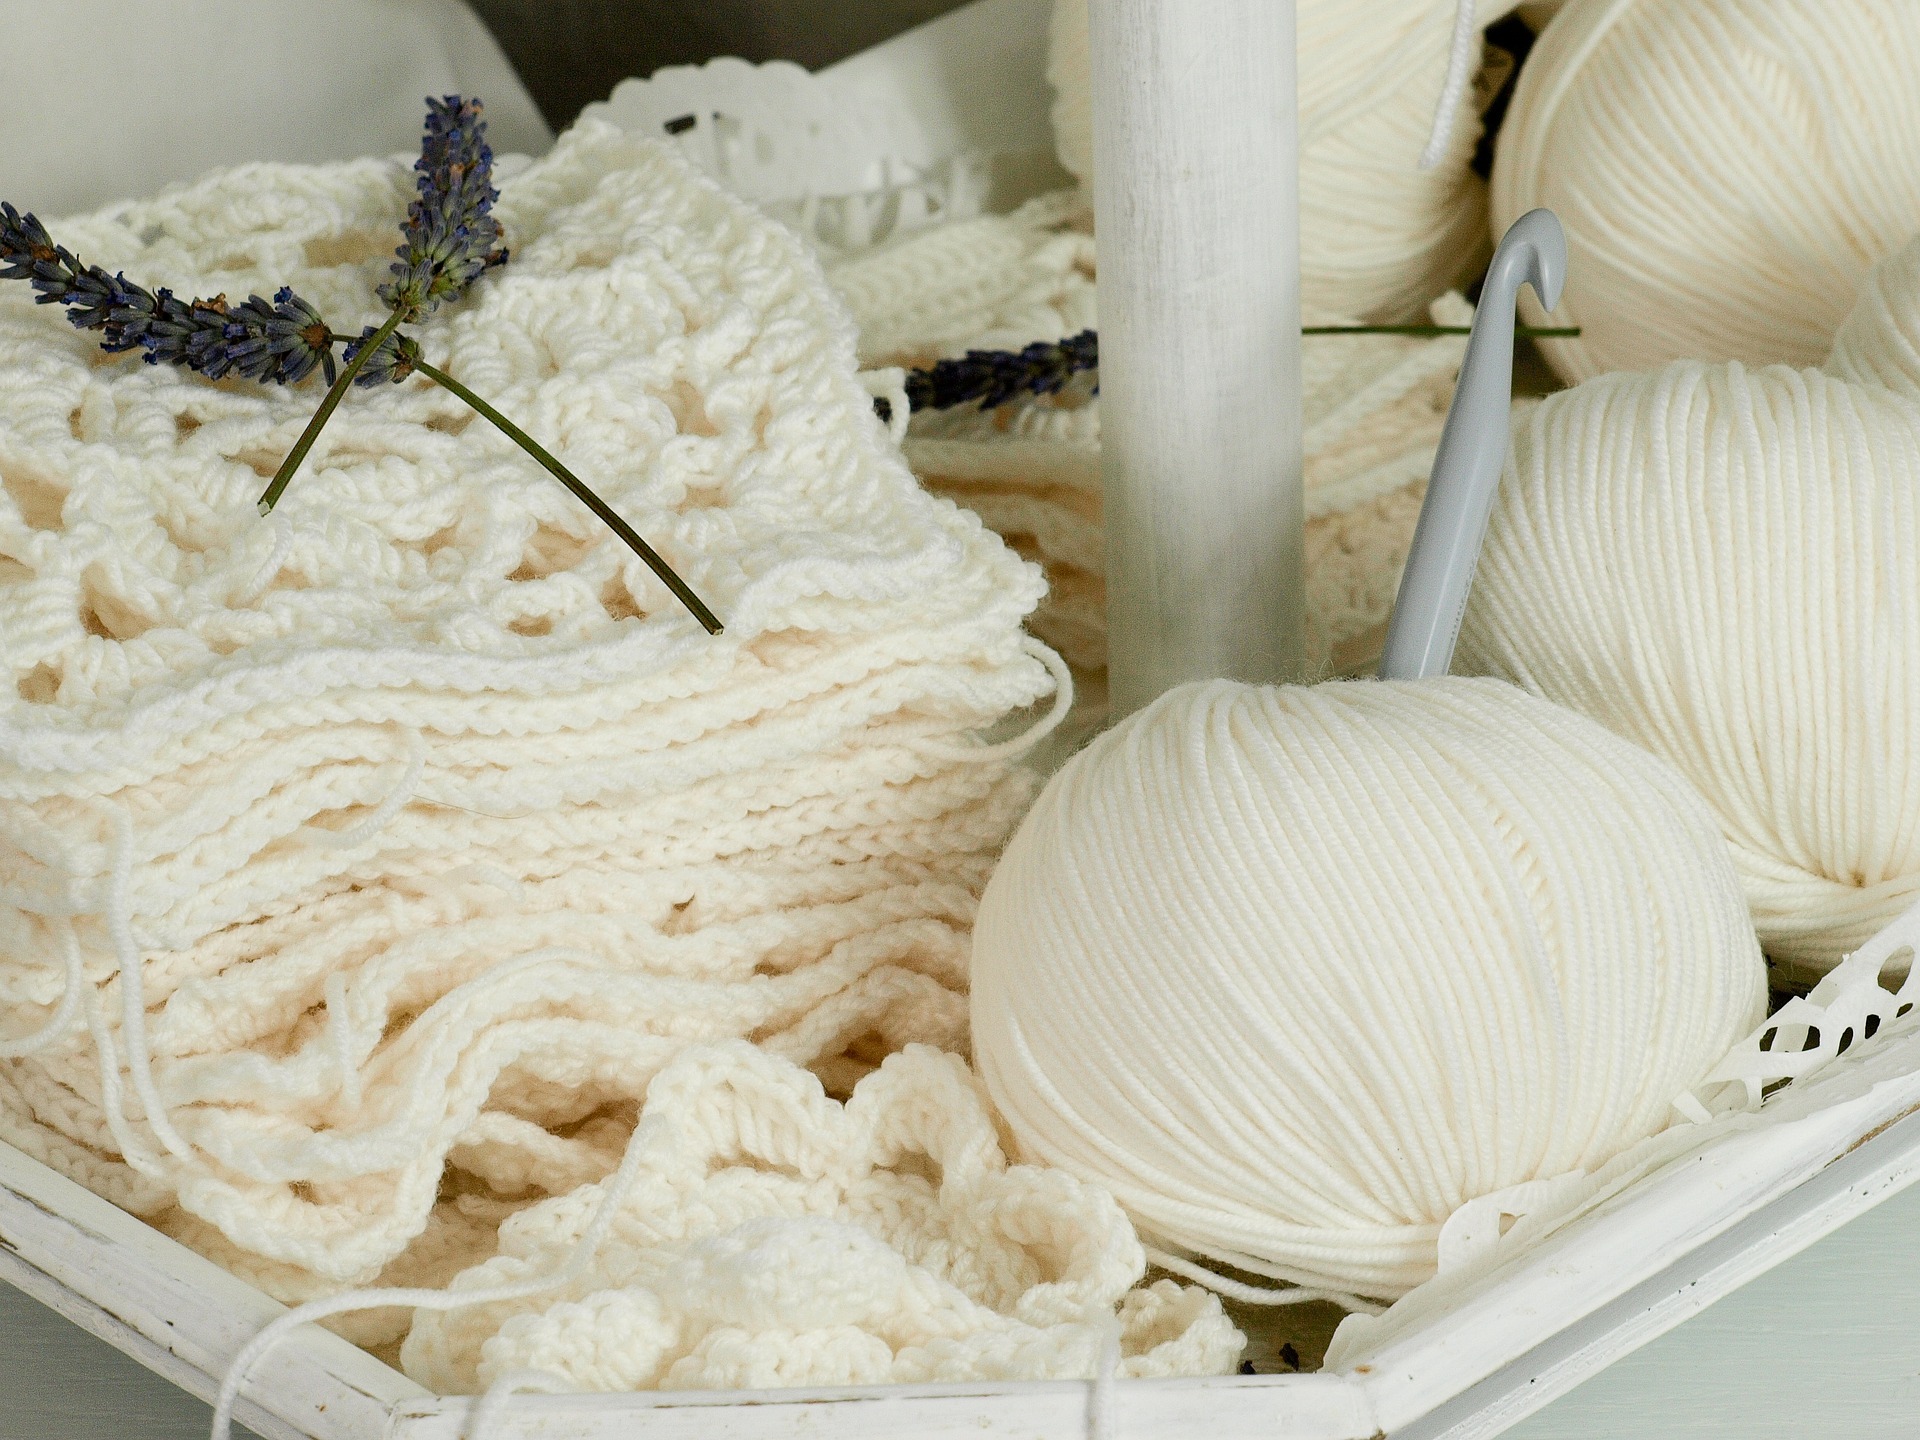
Materials
5mm crochet hook
I used Vanna’s Choice yarns in three colours. It is like a double knitting weight yarn and smooth when running over the hook. Weight [4]. See more on yarn weights.
Tapestry sewing needle to sew in the ends.
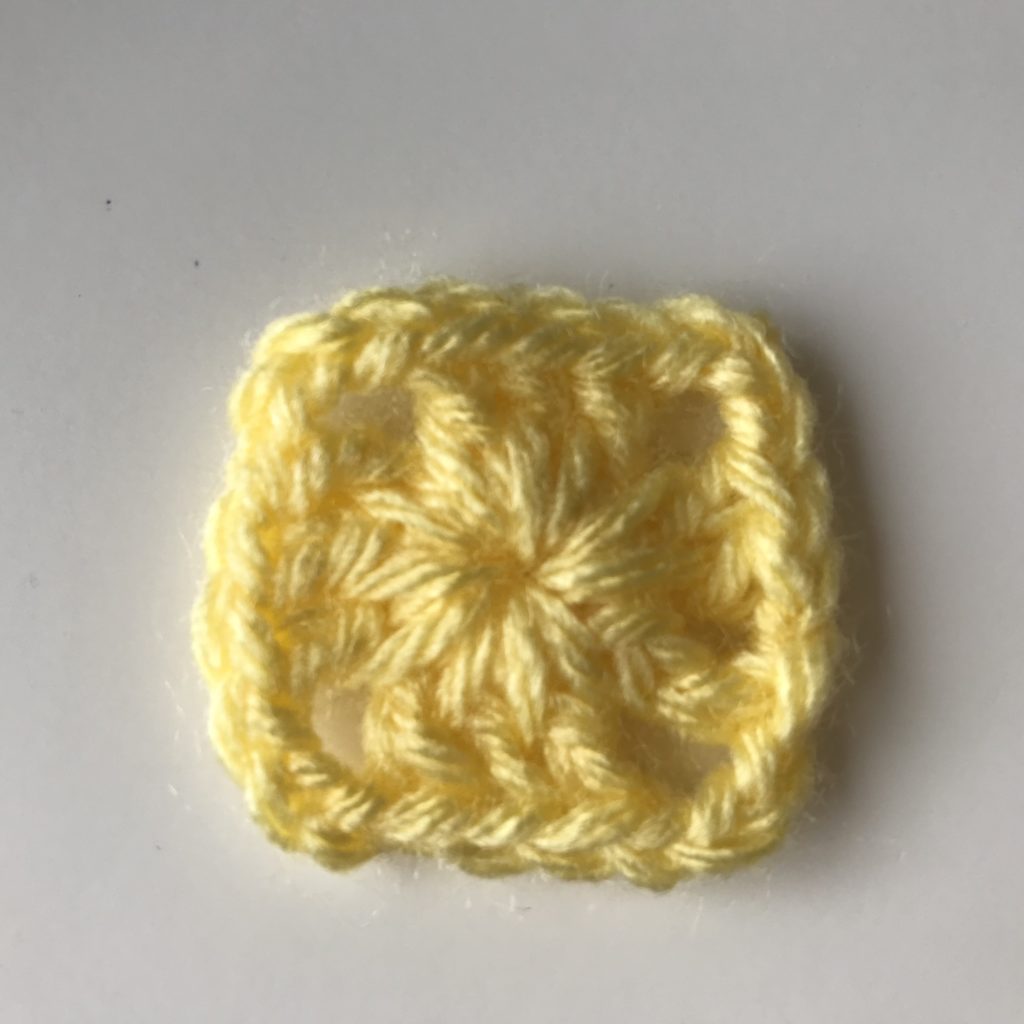
Basic Granny Square Pattern
First row
The first row is in a yellow.
Foundation chain: With yellow, ch 5, join with slip stitch (sl st).
Row1: Ch 2 (as 1st stitch), 2 dc, ch 3 (corner), 3 dc, ch 3, 3 dc, ch 3, 3 dc, ch 3, join with ss. Sew in ends as you go.
First row in yellow.
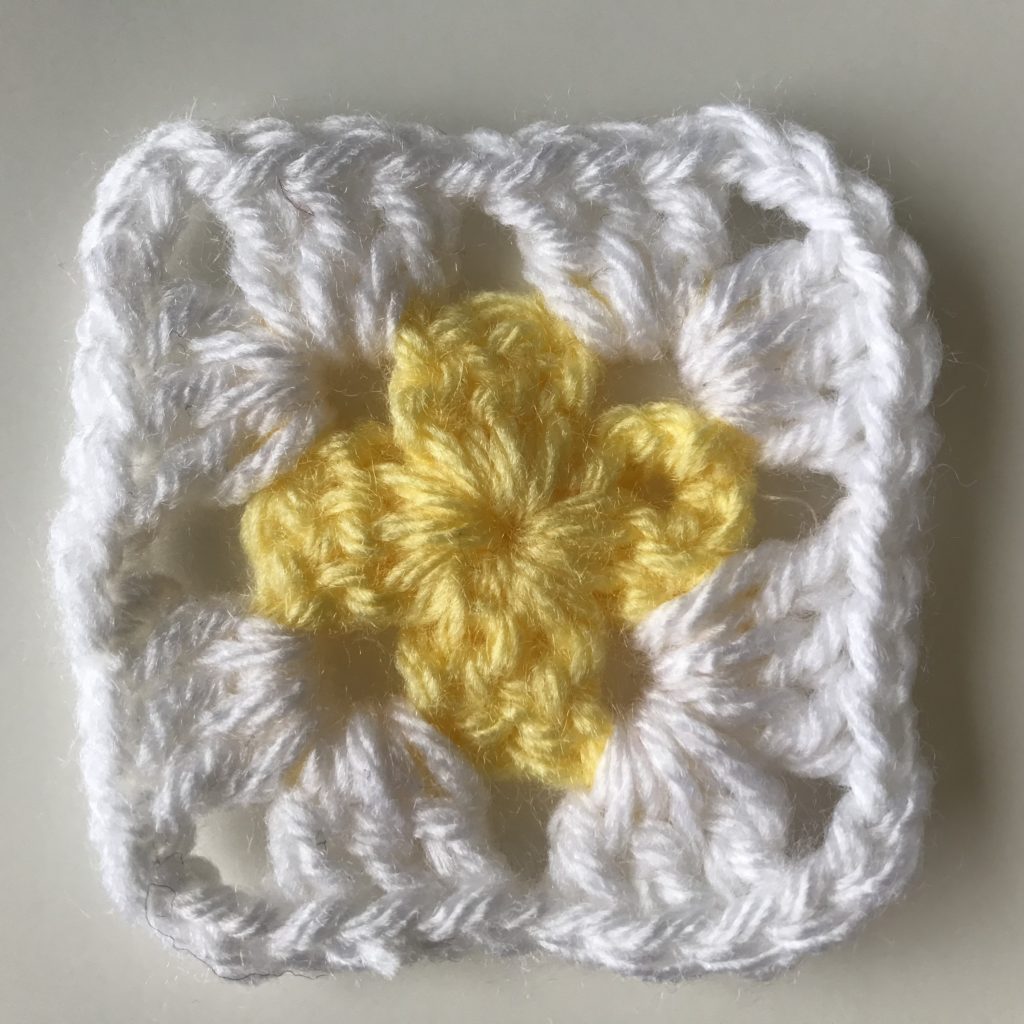
Second Row
The second row is white.
Row 2: With white, wrong side facing, in a corner gap 3dc ch3 3dc, in next corner gap 3dc ch3 3dc, in next corner gap 3dc ch3 3dc, in next corner gap 3dc ch3 3dc, join with a sl st. Sew in ends.
Second row in white.
Third Row
The third row is pink. Row 3: With pink and right side facing, start in a middle gap, 3dc, in first corner gap 3dc ch3 3dc, 3dc, in second corner gap 3dc ch3 3dc, 3dc, in third corner gap 3dc ch3 3dc, 3dc, in last corner gap 3dc ch3 3dc, join with sl st. Sew in ends.
Third row in pink.
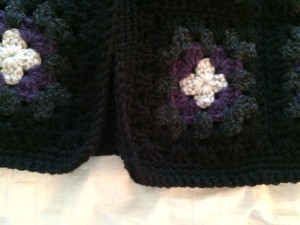
Finished Granny Square
This particular Granny square is an example.
You can make this Granny square in any combination of color and the color choices depend on what you will be using the squares for.
Alison Heathcote, a passionate crochet enthusiast and dedicated business blogger, combines her love for crafting and entrepreneurship to inspire and connect with others.
With a knack for transforming yarn into beautiful creations and a flair for sharing valuable insights about running a successful crochet business, Alison embodies the perfect blend of creativity and practicality.
More Articles
If you enjoyed this post and crochet is your thing, you may like some other crochet articles from our blog.
Author: Alison Heathcote - Published: January 2024 About Our Original Crochet Patterns Finding a crochet pattern can be quite overwhelming with the multitude of options available. However, the real challenge lies in discovering patterns that not only meet your...
Your Dream Customer Hook Day The Day It All Begins The moment you pick up your first crochet hook, your journey begins. The day before, you may never have given crochet a second thought, but now, you've entered a world filled with texture, creativity and endless...
Entrelac crochet is a method of working on the side of previously crocheted pieces. The rows go in different directions and not just straight up. It creates an interesting piece and is strong. This method is usually done with color as the defining result.
Fair Isle crochet
Fair isle crochet is similar to Fair Isle knitting. Each row is worked with two colors and they change throughout the row to make designs in color. Each row has two different colors and the colors change every few rows.
For example:
Row 1: Red and blue
Row 2: Red and green
Row 3: Green and blue
But because each row only has two colors that sets the thickness of the finished item. The Fair Isles are in Scotland and women shepherdesses would tend their flocks of sheep with crochet hooks and balls of wool in their pockets. They would walk the highlands on foot working their crochet as they went.
Filet crochet
Filet crochet is a French type of crochet created in squares. The finished piece looks like a grid with open and closed spaces. The combination of open and closed results in flat pictures of roses or swans or whatever.
Filet designs were originally used to make lace curtains to cover cottage windows. These days filet crochet is used for table cloths, place mats and can be hung as art.
Filet crochet can be done in the round and resultss in beautifully intricate designs.
Tapestry crochet
Tapestry crochet is used to make thick baskets and rugs. It is a sturdy technique and the items are very firm.
You use several colored threads at once, working with one color and carrying the rest along the top of the row being worked. This makes each row very thick.
Color is changed on a stitch by stitch basis. Bowls are a good example of tapestry crochet.
Tunisian crochet
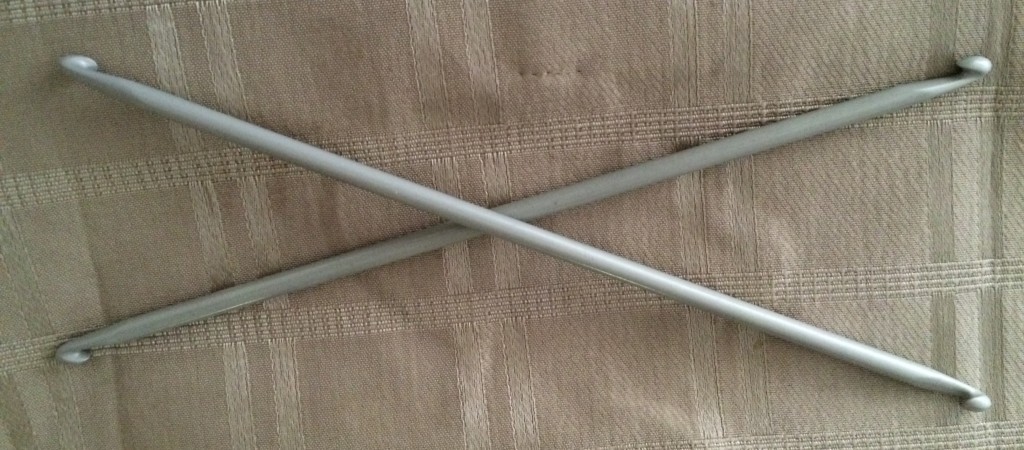
Tunisian crochet is also referred to as afghan crochet. For Tunisian crochet you use a special hook (called a Tunisian crochet hook), which typically has a crochet hook at one end and is as long as a knitting needle and has a knitting needle stop end at the other. So really it is like a knitting needle but with a hook and not a point.
Below are my two favourite Tunisian crochet hooks, (in my size 5mm as usual), and these have hooks at both ends opening up the possibilities for advanced Tunisan crochet work.
Tunisian crochet hooks come in all the same sizes as regular crochet hooks. With Tunisian crochet you carry many stitches at once on forward rows and hook them off on the backward rows.
Tunisian crochet makes a very thick fabric and is normally used for blankets, cushions, bags and soft furnishings.
Tunisian crochet is like a combination of crochet and knitting all in one. It is an advanced technique. Tunisian crochet can be combined with entrecôte crochet.
[/et_pb_text][/et_pb_column][/et_pb_row]
More Articles
If you enjoyed this post your may like some other articles from our blog.
Author: Alison - Updated: November 2024 Crochet Basics Getting Started About Crochet Crochet is a vast subject. and you really need to know a few of the basics before you can really get into it. This post is just to go over a few of the basic points and in crochet...
Inspiration Looking at the wonderful old cable patterns with deep texture inspired me to make this collection of three cozy cable headbands for you. These headbands can be used as ear warmers as well. I live in Vancouver, Canada where the winters can be rainy...
Reading a written crochet pattern assumes many things.
Such as:
That you can read English
That you use either UK or USA stitch names
That the pattern is written correctly
That the pattern instructions are clear
Let’s look at each one by itself.
It assumes that – you speak English
I speak English as probably you do to as you are reading this. But I also like to use patterns from other countries.
I think the Japanese crochet diagrams are the best. They are clear and precise and I don’t have to read Japanese to use the patterns.
Likewise, if I design a crochet garment and I only write the pattern in English words, then other world wide crocheters can’t read my work.
I want my designs to be used by all crocheters and that is why I write the pattern in English and draw the crochet stitch diagram to go with it.
Almost every pattern on my site and my books are both written and have a diagram.
It assumes that – you know the difference between a UK or USA stitch
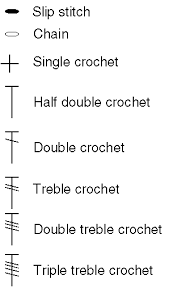
The difference between UK and USA crochet stitches and why the diagram is clear.
The UK double crochet and treble crochet are the same as the USA single crochet and double crochet.
The actual stitch is the same but the name of the stitch is different.
Double Crochet (USA) is the same as Treble Crochet (UK)
Yarn over hook (two loops on hook)
Insert hook into stitch below.
Yarn over hook, and pull through stitch below (three loops on hook)
Yarn over hook, pull through two loops (two loops remain on hook).
And then, yarn over hook, pull through two loops (two loops remain on hook).
Yarn over hook, pull through last two loops (one loop remains on hook).
It assumes that – the pattern is written correctly
In a written crochet pattern there are lines of code for the pattern rows. Such as:
RSF R1, yoh (rep5.) 3tr, 2ch 1FPst (rep. from * to * 8 times) turn.
Now in the above sentence (if it is a sentence), any error in the typing (a typo) will create an error in the pattern. And the crafter will not be able to complete the garment because she can’t read the pattern.
In a long pattern with motives, sections and finished borders there could be over 100 lines of pattern instruction. One line will create a problem and often there are two or three errors in a pattern.
This makes the whole job a frustration and the crocheter may give up and (this is the worse part), tell others that your patterns are always incorrect and they should avoid them.
This is not good if you are in the business of selling patterns.
It assumes that – the instructions are clear
There comes a time in written crochet patterns when they will benefit from more explanation. This is achieved by expanding on the instructions and writing instructions in plain English.
We can all do with clarity at times. And crochet patters are no exception.
If a pattern is too hard to understand because of how it is written then it will not work. That pattern is no good.
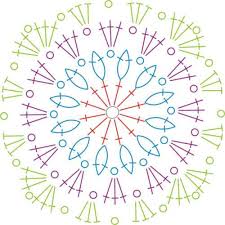
Crochet diagrams symbols
Diagram symbols
In diagram a there is one symbol for every stitch.
Chain
Slip stitch
Double crochet
Treble crochet
Each symbol is drawn separately.
Diagram rows
Each row is numbered.
Every row has an arrow indicating which way the row is worked. Either left to right, right to left or in the round.
Typically each Rosie drawn in a different color so you ca clearly see which row you are on. Here I use black and blue to separate the rows.
Benefits of crochet pattern diagrams
A picture is worth a thousand words. And this is true of crochet diagrams.
Uses left brain of visual imagery.
Designer can be non-native English speaker.
The diagram can be read by everyone on earth.
Clarity uses less space. One page for each project.


 Tunisian crochet hooks come in all the same sizes as regular crochet hooks. With Tunisian crochet you carry many stitches at once on forward rows and hook them off on the backward rows.